How to Stop SSDT / Database Projects / SQLPackage from Modifying Database Options
SQL Server’s free state-based version control tooling was introduced under the ‘Data Dude’ brand, then became known as ‘SQL …
Read MoreBy Kendra Little on • 7 min read
I redid my static site’s contact form with a free option from my host, Netlify.
Here’s why I changed my static site host and how I got a Netlify contact form to work with a blog built on Hugo and the Mainroad theme.

I wrote back in 2021 about Moving From WordPress to an Azure static site with Hugo. Since then, I migrated away from Azure Static Sites to Netlify’s free plan.
I moved to Netlify for a couple of reasons:
I’d already reduced image file sizes where it made sense and moved larger files off to 3rd party services for hosting and embedding. There was little advice on troubleshooting this issue in Azure, and I have a lot of hobbies to tend to.
Netlify’s free plan doesn’t have this limitation.
While I’d previously set up a simple option embedding a Google form on my contact page, I didn’t love the workflow with this solution. I wanted something better.
I probably should have blogged about how I migrated to Netlify, if only because it was so simple that I barely remember what I did. I remember that Netlify walked me through everything, and that it was quite easy. I don’t think I even had to provide a credit card number in the process.
It took me a while to get around to redoing my contact form, and here’s how I did it.
First, you’ll need to enable forms in your Netlify site configuration.
Site configuration -> Forms.Enable form detection.This won’t do anything right away. The next time you deploy the site, Netlify will look for forms which want to hook up.
From a terminal, I ran: hugo serve
I then regularly referred to my locally served version of the site as I stepped through the following. This helped me check functionality as I saved changes to ensure I knew what was working.
While there are several posts and tutorials out there on how to do this, I hadn’t worked with Hugo in a minute. I had to spend some time remembering how this all works, and which files I even use for html. Oh, right, the magic happens in Go templates!
Under my layouts folder, I added a new folder, contact. In this folder I created a new file named single.html.
{{ define "main" }}
<main class="main" role="main">

 <form name="contact" class="contact-form width-normal" action="/contact-thank-you/" method="POST" data-netlify="true" netlify-honeypot="bot-field">
  <input type="hidden" name="form-name" value="contact" />
  <p class="hidden">
   <label><input name="bot-field" /></label>
  </p>
  <div class="form-group">
   <!-- Text input-->
   <label class="contact-form-1 control-label" for="Name"></label>
   <div class="contact-form-1">
    <input id="contact-form-name" name="Name" type="text" placeholder="Name" class="form-control input-md" required="" autocomplete="off" maxlength="100">
   </div>
   <!-- Text input-->
   <label class="contact-form-1 control-label" for="Email"></label>
   <div class="contact-form-1">
    <input id="contact-form-email" name="Email" type="email" placeholder="Email" class="form-control input-md" required="" autocomplete="off" maxlength="100">
   </div>
   <!-- Text input-->
   <label class="contact-form-1 control-label" for="Subject"></label>
   <div class="contact-form-1">
    <input id="contact-form-subject" name="Subject" type="text" placeholder="Subject" class="form-control input-md" required="" autocomplete="off" maxlength="200">
   </div>
   <!-- Textarea -->
   <label class="contact-form-1 control-label" for=""></label>
   <textarea class="form-control" id="contact-form-message" name="Message" placeholder="What's up?" rows="8"></textarea>
   <!-- Button -->
   <button class="contact-button" type="submit" value="Submit" id="Form-submit">Submit</button>
  </div>
 </form>
</main>

{{ partial "authorbox.html" . }}
{{ partial "pager.html" . }}

{{ end }}
data-netlify="true". This means that the next time you publish the site, the form may be detected by Netlify, as long as you’ve enabled forms on the site.netlify-honeypot="bot-field". There is also an input named bot-field that has a css class specified named hidden. Together, these are used as a spam reduction feature in Netlify.At this point, as long as you don’t already have a contact folder which this template would apply to, you shouldn’t notice any differences in your locally served copy of your site.
If I was adding a new contact page, I could have added a new folder named content/contact. This would automatically pick up the contact template.
However, I already had a contact page in place with a URL I wanted to maintain that didn’t involve a “contact” subfolder, so I edited my existing file which I had under content/contact-kendra-little.md.
The entire definition of this page is as follows. The important bit is that I added the line type: contact to the front matter so that it will pick up that layout.
---
title: "Contact"
draft: false
authorbox: false
pager: false
menu: main
type: contact
---
At this point, your locally served copy of the site should have a contact form which displays the html form in the template.
The styling, however, may look a little wonky. Mine sure did. And if you don’t have any css already that hides fields with a class named hidden, you will also see the honeypot field on your form, which will look odd.
The next thing I had to remember was where to customize css files. At this point, I asked GitHub Copilot for help:
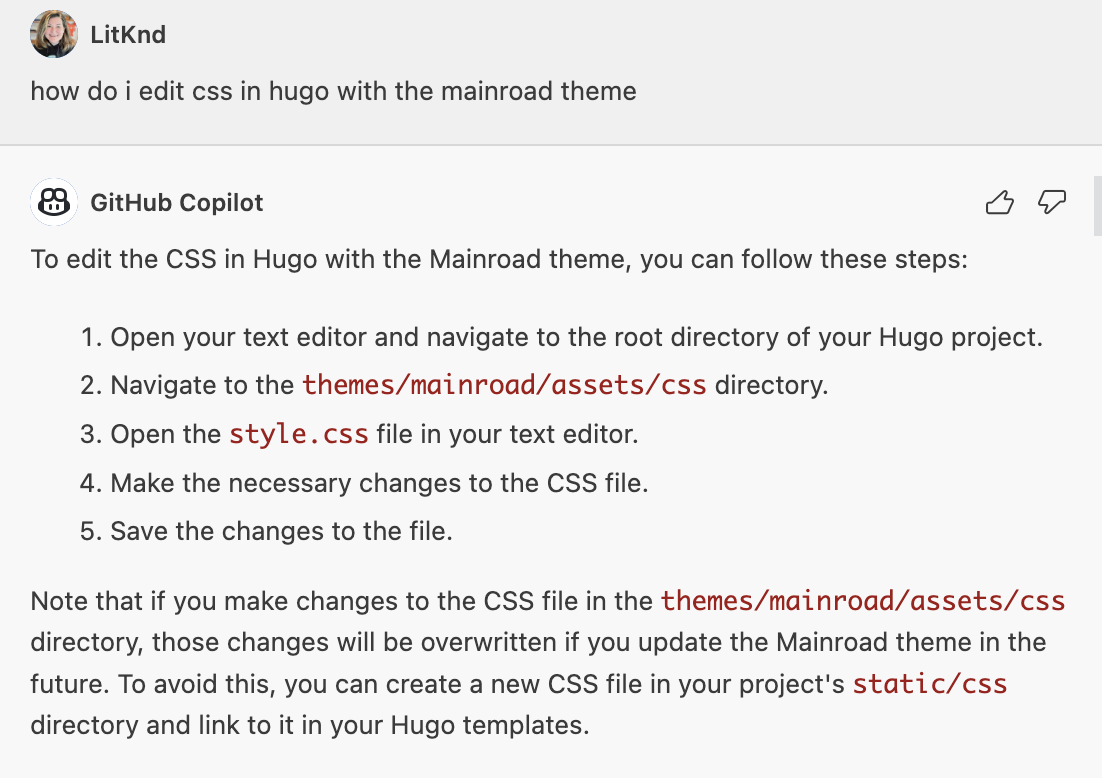
I already had a file named static/css/custom.css, but create one if needed.
I added the following css to get my form working, using my locally served copy of the site as I made changes.
  .hidden {
    display: none;
  }

  .contact-form-1 input[type="text"],
  .contact-form-1 input[type="email"],
  textarea {
    font-family:'Lucida Sans', 'Lucida Sans Regular', 'Lucida Grande', 'Lucida Sans Unicode', Geneva, Verdana, sans-serif;
    font-size: 1rem;
  }

  /* Add a background color and padding */
  .contact-form-1   {
    max-width: 90%;
    padding-top: 6px;
    padding-bottom: 6px;
    border-radius: 5px;
  }

  /* Style the submit button  */
  .contact-button {
    background-color: #ff8400;
    color: white;
    padding: 4px 4px;
    border: none;
    border-radius: 4px;
    cursor: pointer;
  }

.contact-button:hover {
    background-color: #ff5100;
  }
My form declaration specifies action="/contact-thank-you/".
I created a page at content/contact-thank-you.md with the following definition:
---
title: "Thanks for getting in touch"
draft: false
authorbox: false
pager: false
---

I try to reply to most emails within a few business days.

{{< figure src="/images/contact-kendra-little.jpg" width="650" >}}
To actually test the form, you need to commit your changes and deploy your site. You can do this a bunch of ways with Netlify– go with whatever you are comfortable with, and which meets the requirements of your site.
I want to get an email when someone fills out the contact form on my site. You can configure this in the Netlify UI by enabling email notifications for one or more forms. Essentially:
Site configuration -> Forms -> Form notifications.Add notification, then step through the wizard to configure the notification.Now test out using the form on your published site, and make sure you get the email.
Netlify provides troubleshooting tips if you run into problems.
I used the following sources as references when setting this up:


Copyright (c) 2025, Catalyze SQL, LLC; all rights reserved. Opinions expressed on this site are solely those of Kendra Little of Catalyze SQL, LLC. Content policy: Short excerpts of blog posts (3 sentences) may be republished, but longer excerpts and artwork cannot be shared without explicit permission.